
This is a “Quick start” article; therefore, it aims at beginner drone pilots and hobby modelers. This article deals with flight path planning for drone photogrammetry survey.
The output files of the photogrammetry survey can be large point clouds, orthomosaics, digital elevation models (DEM) and 3D models. These can be difficult to share with the client and colleagues. It is strongly recommended to use the SurveyTransfer data sharing software! For more information, visit the website of the software manufacturer by clicking HERE.
Through the article we present freeware programs, so everyone can try them.
In summary, I show the following in the article:
● Aerial photogrammetry briefly summarized.
● Flight missions – which can be used for what.
● Flight route planning.
What will you need? I present the route planning in the PIX4D Capture mobile application. PIX4D Capture is considered an entry-level program, it doesn’t offer many customization options, but I think beginners will like its simplicity. Before you install the PIX4D Capture app, check whether it is compatible with the operating system of your phone/tablet and your drone! You can check this here.
If you would like to try more detailed settings, I recommend checking out Drone Harmony.
1. BE AWARE OF THE BASICS OF DRONE PHOTOGRAMMETRY!
Now we will only focus on orthophoto mosaics and 3D modeling purposes. The generation of maps and 3D models derived from photographs carried out with the help of UAVs is classified as aerial photogrammetry and in most cases is done by using several images at the same time.
According to this, we take digital photos with the drone and then analyze them using photogrammetry processing software. The processing program performs various calculations on the images. The results are point clouds, textured 3D models, orthophoto maps, and digital elevation model files. In the case of a drone, the software takes location data into account, so the files that will be produced will also include their geographic location. To ensure that the resolution and data density of the output files are adequate, you must fly based on a previously planned scheme, and then take pictures at specified distances or intervals along the route. With these methods, you can achieve that the images are created with a suitable overlap, so the result of the model creation is also good. Of course, the question of lighting conditions, camera settings, and tilting the camera also appears here. We will not go into detail about these now, if you are interested in the topic, then be sure to read our article on the basics of photogrammetry, as well as our article on close-up photogrammetry. For the hardcore professionals, I also recommend our terrain tracking drone survey article that addresses the issue of GSD (Ground Sample Distance). In this current article we will use such a mobile application that enables us to plan the drone’s path. This is good because you can easily program your drone to fly a specific route fully automatically and take photos with predefined overlaps. The photos taken in this way will be suitable for creating maps and models.
Sidenote: It’s possible to take photos while flying manually. Read more about this in the “free flight mission” chapter.
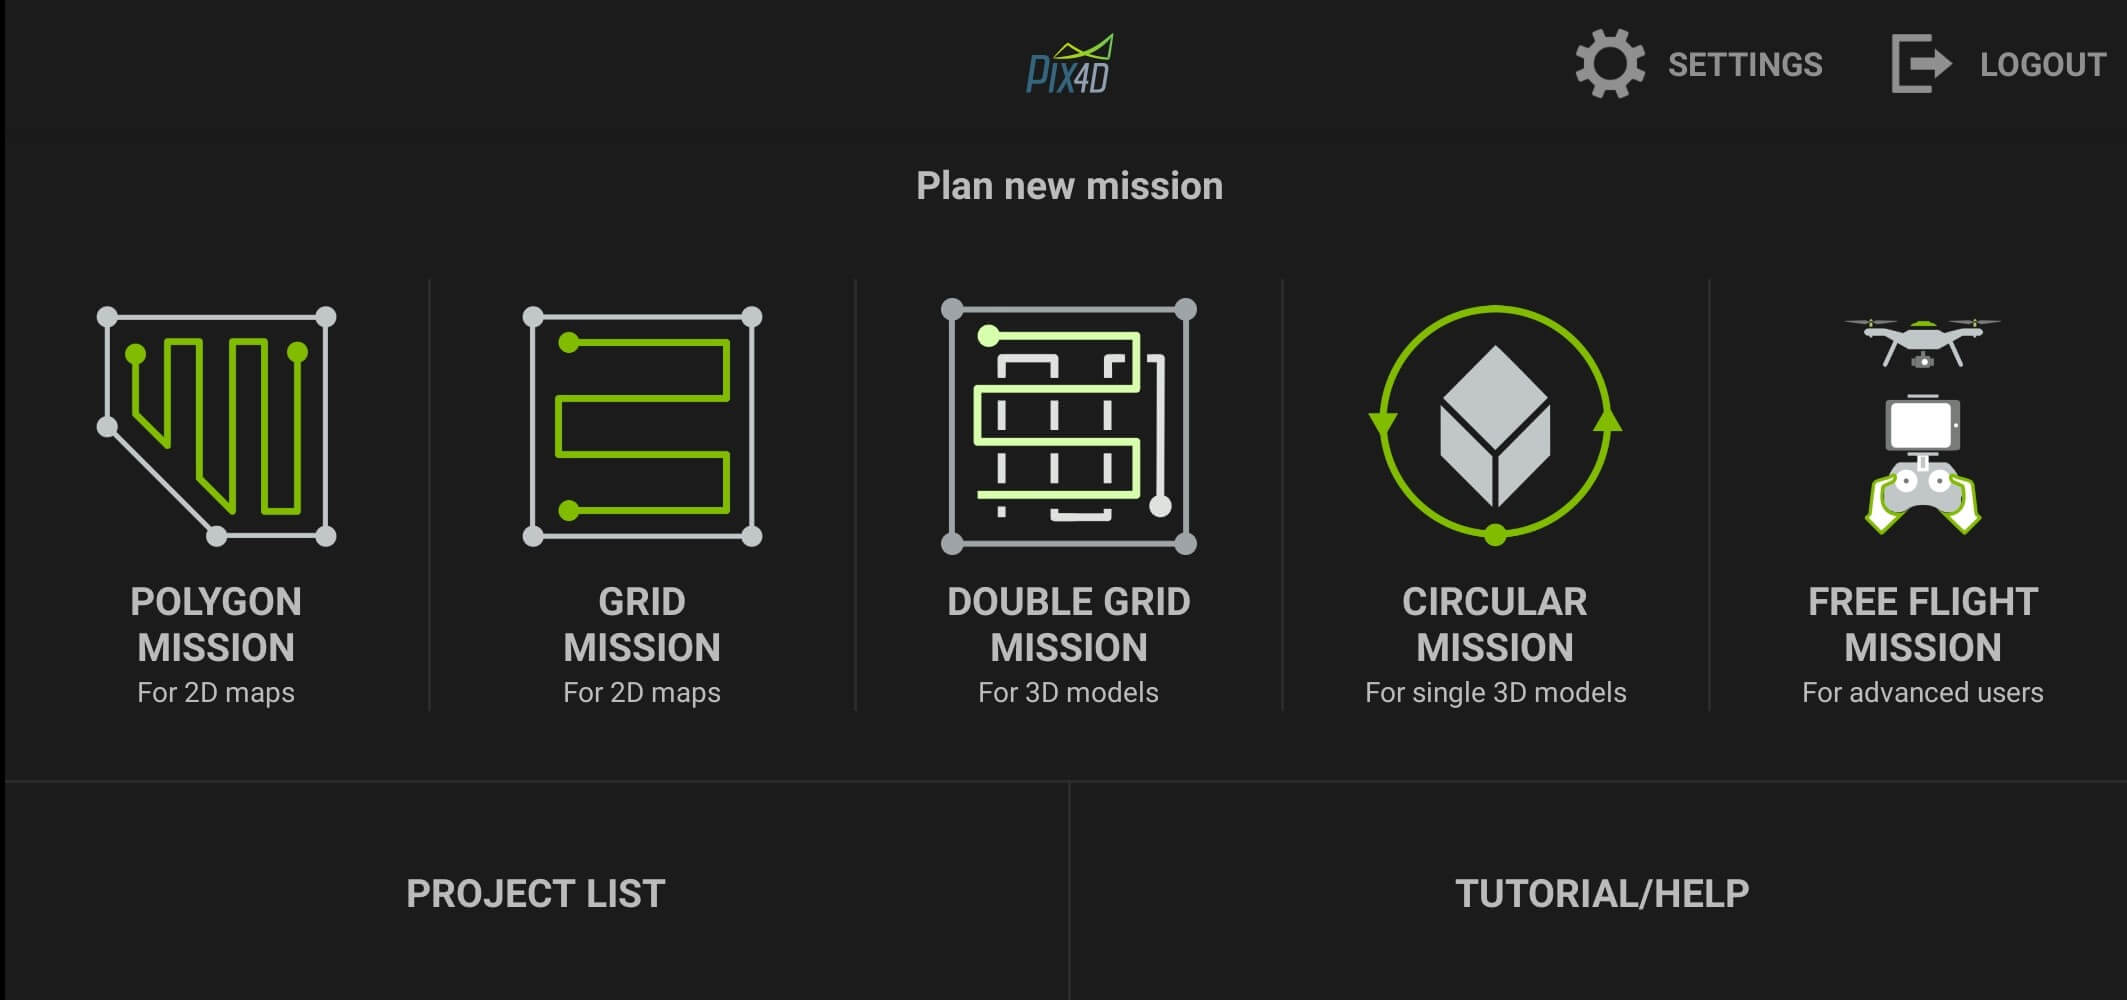
2. SELECTING THE OPTIMAL DRONE MISSION FOR THE SURVEY
Once you’ve installed and started PIX4D Capture you need to register and specify your drone. If you want, turn on your drone and connect it, but this is not a necessary step for route planning.
After the application starts, you will see the following image.
In the following chapters, we briefly cover what you need to know about these surveying methods.
2.1. DRONE’S PHOTOGRAMMETRY Surveying I. – POLYGON MISSION
This surveying method allows freely setting the boundaries of the surveying area, so a more complicated shape can also be created. It is worth choosing this if you want to survey a larger, flat area (arable land, coastlines, construction area, etc.) for mapping (2D) purposes. Recording will be most effective when using a straight down (nadir) camera position. The output files of the photogrammetry process will be high-quality orthophoto maps and digital surface models.
All this does not mean that it is not suitable for making 3D models, but they will be of very poor quality, since a detailed photograph of the vertically positioned sides of the object is not taken.
2.2. DRONE’S PHOTOGRAMMETRY Survey II. – GRID MISSION
This surveying method is also suitable for mapping purposes, just like the procedure presented in the previous subchapter. The difference is that in this case you cannot set the borders of the area freely. Here, you plan the recording route within a regular rectangular shape.
2.3. DRONE’S PHOTOGRAMMETRY Survey III. – DOUBLE GRID MISSION
“Double Grid” means flying back and forth on the lines of a square grid multiple times. This is suitable for photographing an object from several sides. Compared to the simple “Grid mission”, this mode allows you to capture more vertical and regressive detail, which is extremely important for a 3D reproduction.
It’s not a bad solution for map-making purposes either, but here the oblique camera position is recommended and it is suitable mainly for 3D photogrammetry mapping.
This shooting method is recommended if you want to photograph a small or medium area, as the flight time is doubled compared to the simple “Grid” mission. The flight time is longer because photography takes place in two grids, from several angles. With this procedure, you can survey for example building complexes or parts of towns. It is recommended if you want to produce a textured 3D model and point cloud.
2.4. DRONE’S PHOTOGRAMMETRY Survey IV. – CIRCULAR MISSION
This mode can be used to survey tall objects within a small area. The essence of the recording procedure is that the drone flies around the object and photographs it from different heights and directions.
The procedure is particularly well suited to survey tall buildings and towers. This mode is primarily used to create 3D models and point clouds.
2.5. DRONE’S PHOTOGRAMMETRY Survey V. – FREE FLIGHT MISSION
With this mode you can fly an area manually, therefore, it requires a lot of practice. During the surveying you can set how often (in meters, both vertically and horizontally) you want the drone to take photos. The camera shutter is released automatically when you move the drone by the specified distance interval.
If you are an experienced drone pilot, you can use this flight procedure for mapping and 3D modeling purposes. In this case, be very careful about the correct camera settings, camera angles, subject distances and overlaps between photos.
3. DRONE PHOTOGRAMMETRY SURVEY PATH PLANNING
For the sake of an example, select the “DOUBLE GRID MISSION” option. If you are at the surveying location, you can use the position of your phone/tablet to adjust the center of your flight path to your own position. To do this, first press the position determination button (1). Then, press “Center the map view on the grid” option (2). You can set a satellite image or plain map view (3) as the base map of the application. You can change the size of the area by moving the points on the sides and vertices of the rectangle (4). You can rotate the area using the two arrows (5). If you want to move the entire rectangle, you can move it with the middle, outward-pointing arrows (6). If you would like to restore the basic rectangle, press the arrow pointing back (7).
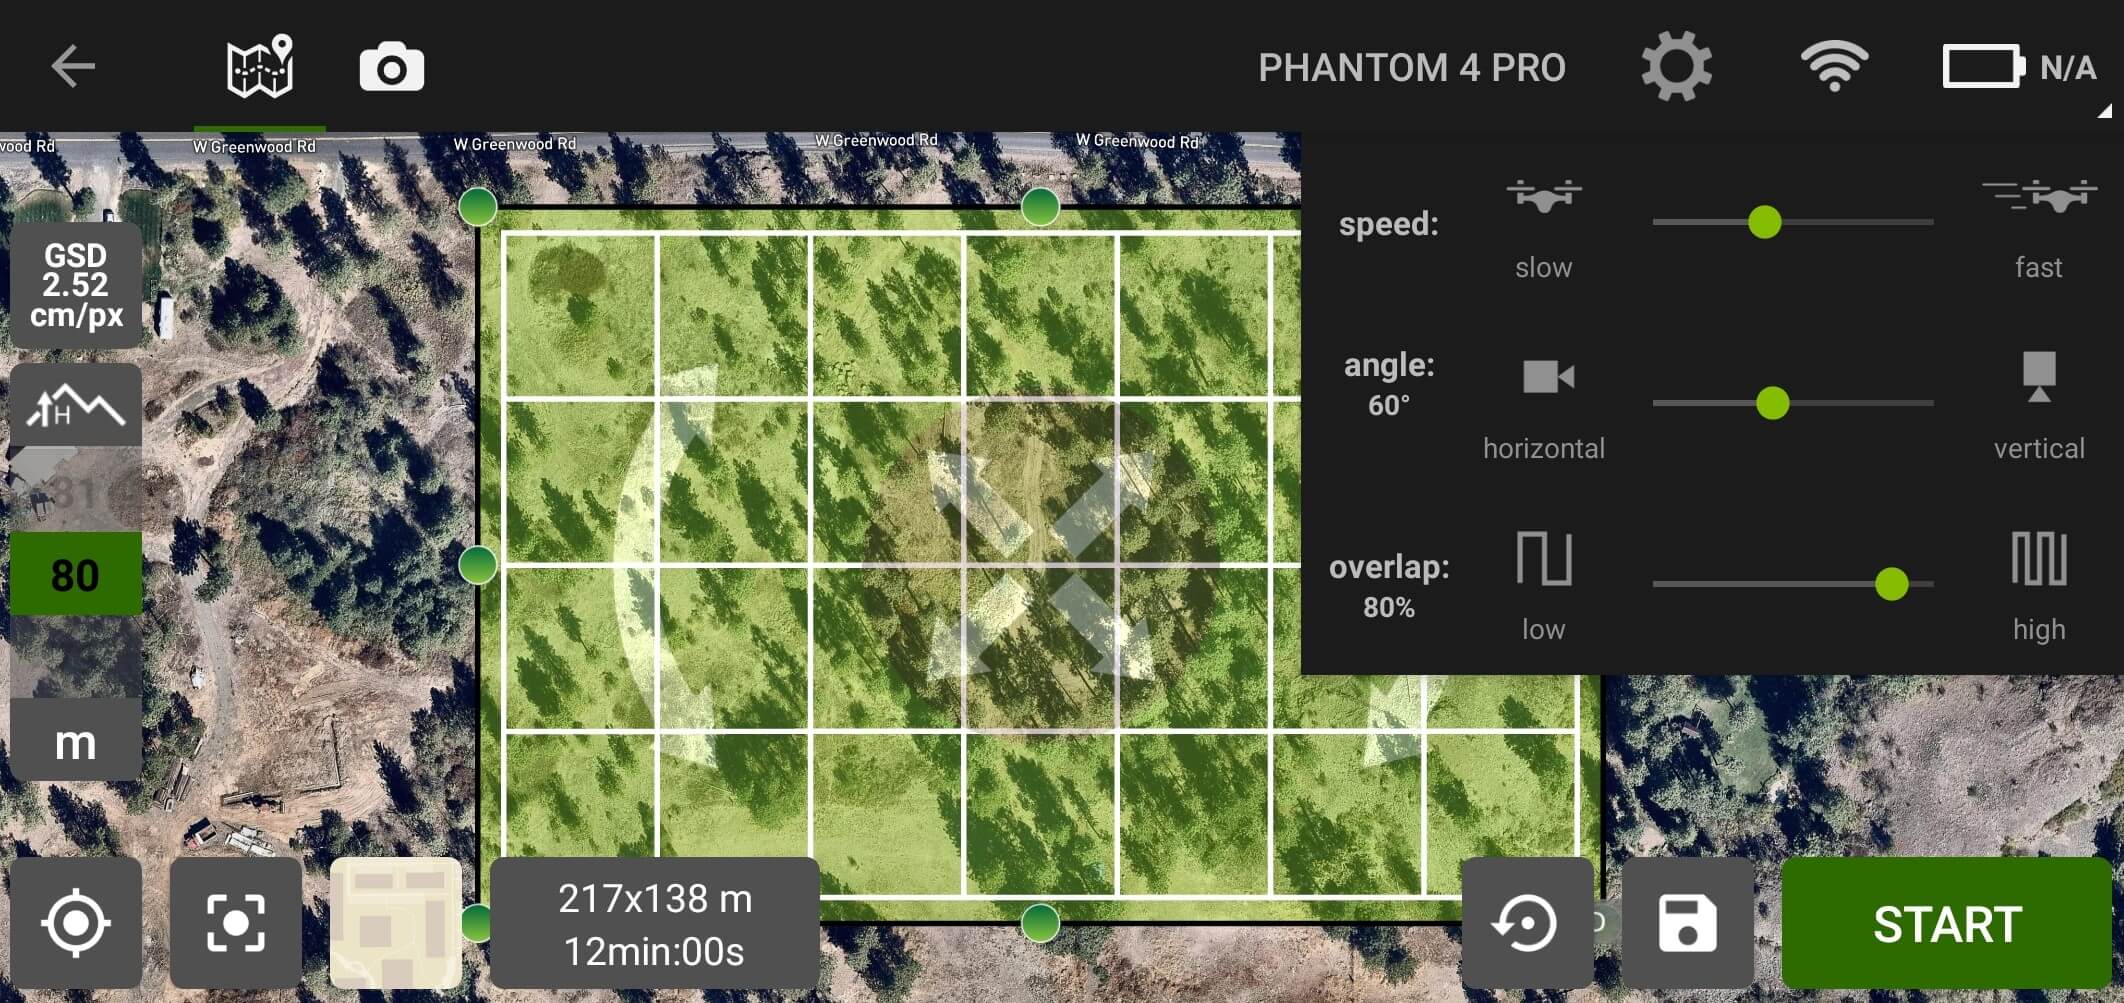
Finally, enter the flight altitude (8), then under the settings button (9) the speed of the drone (speed), the angle of the camera (angle) and the overlap between the images (overlap).
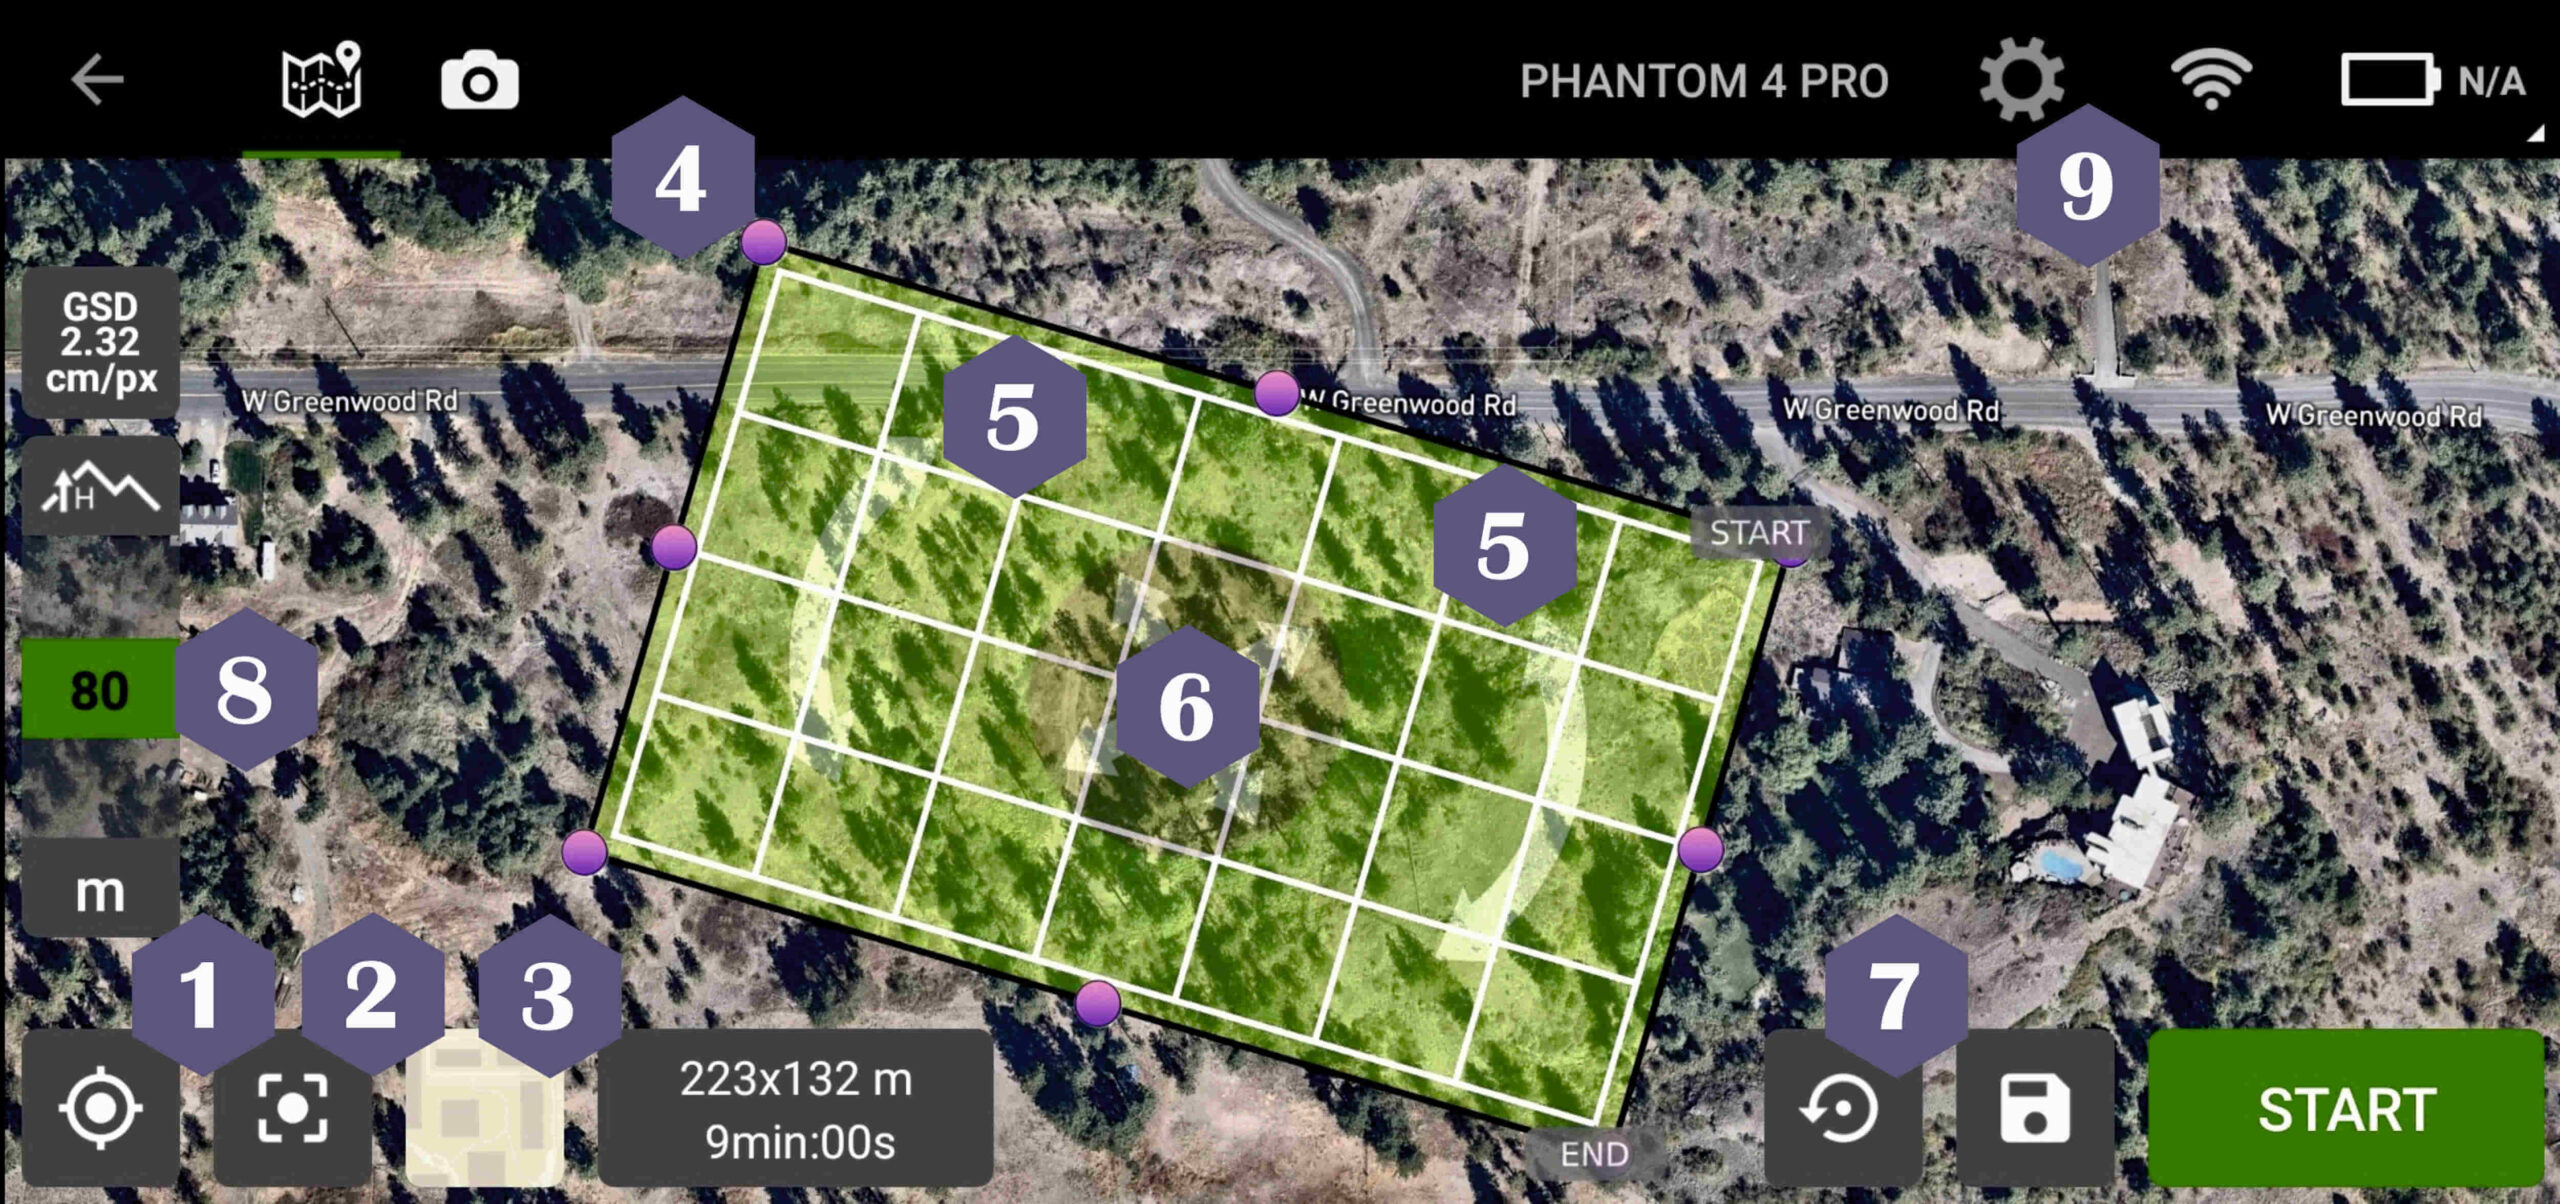
It is worth lowering the speed a little to avoid blurry photos. If you are creating a map, set the angle of the camera as high as possible (recommended 90°), if the goal is a 3D model, then set a smaller value (e.g., 60°). For the overlap, enter a value above 60% (recommended 80%).
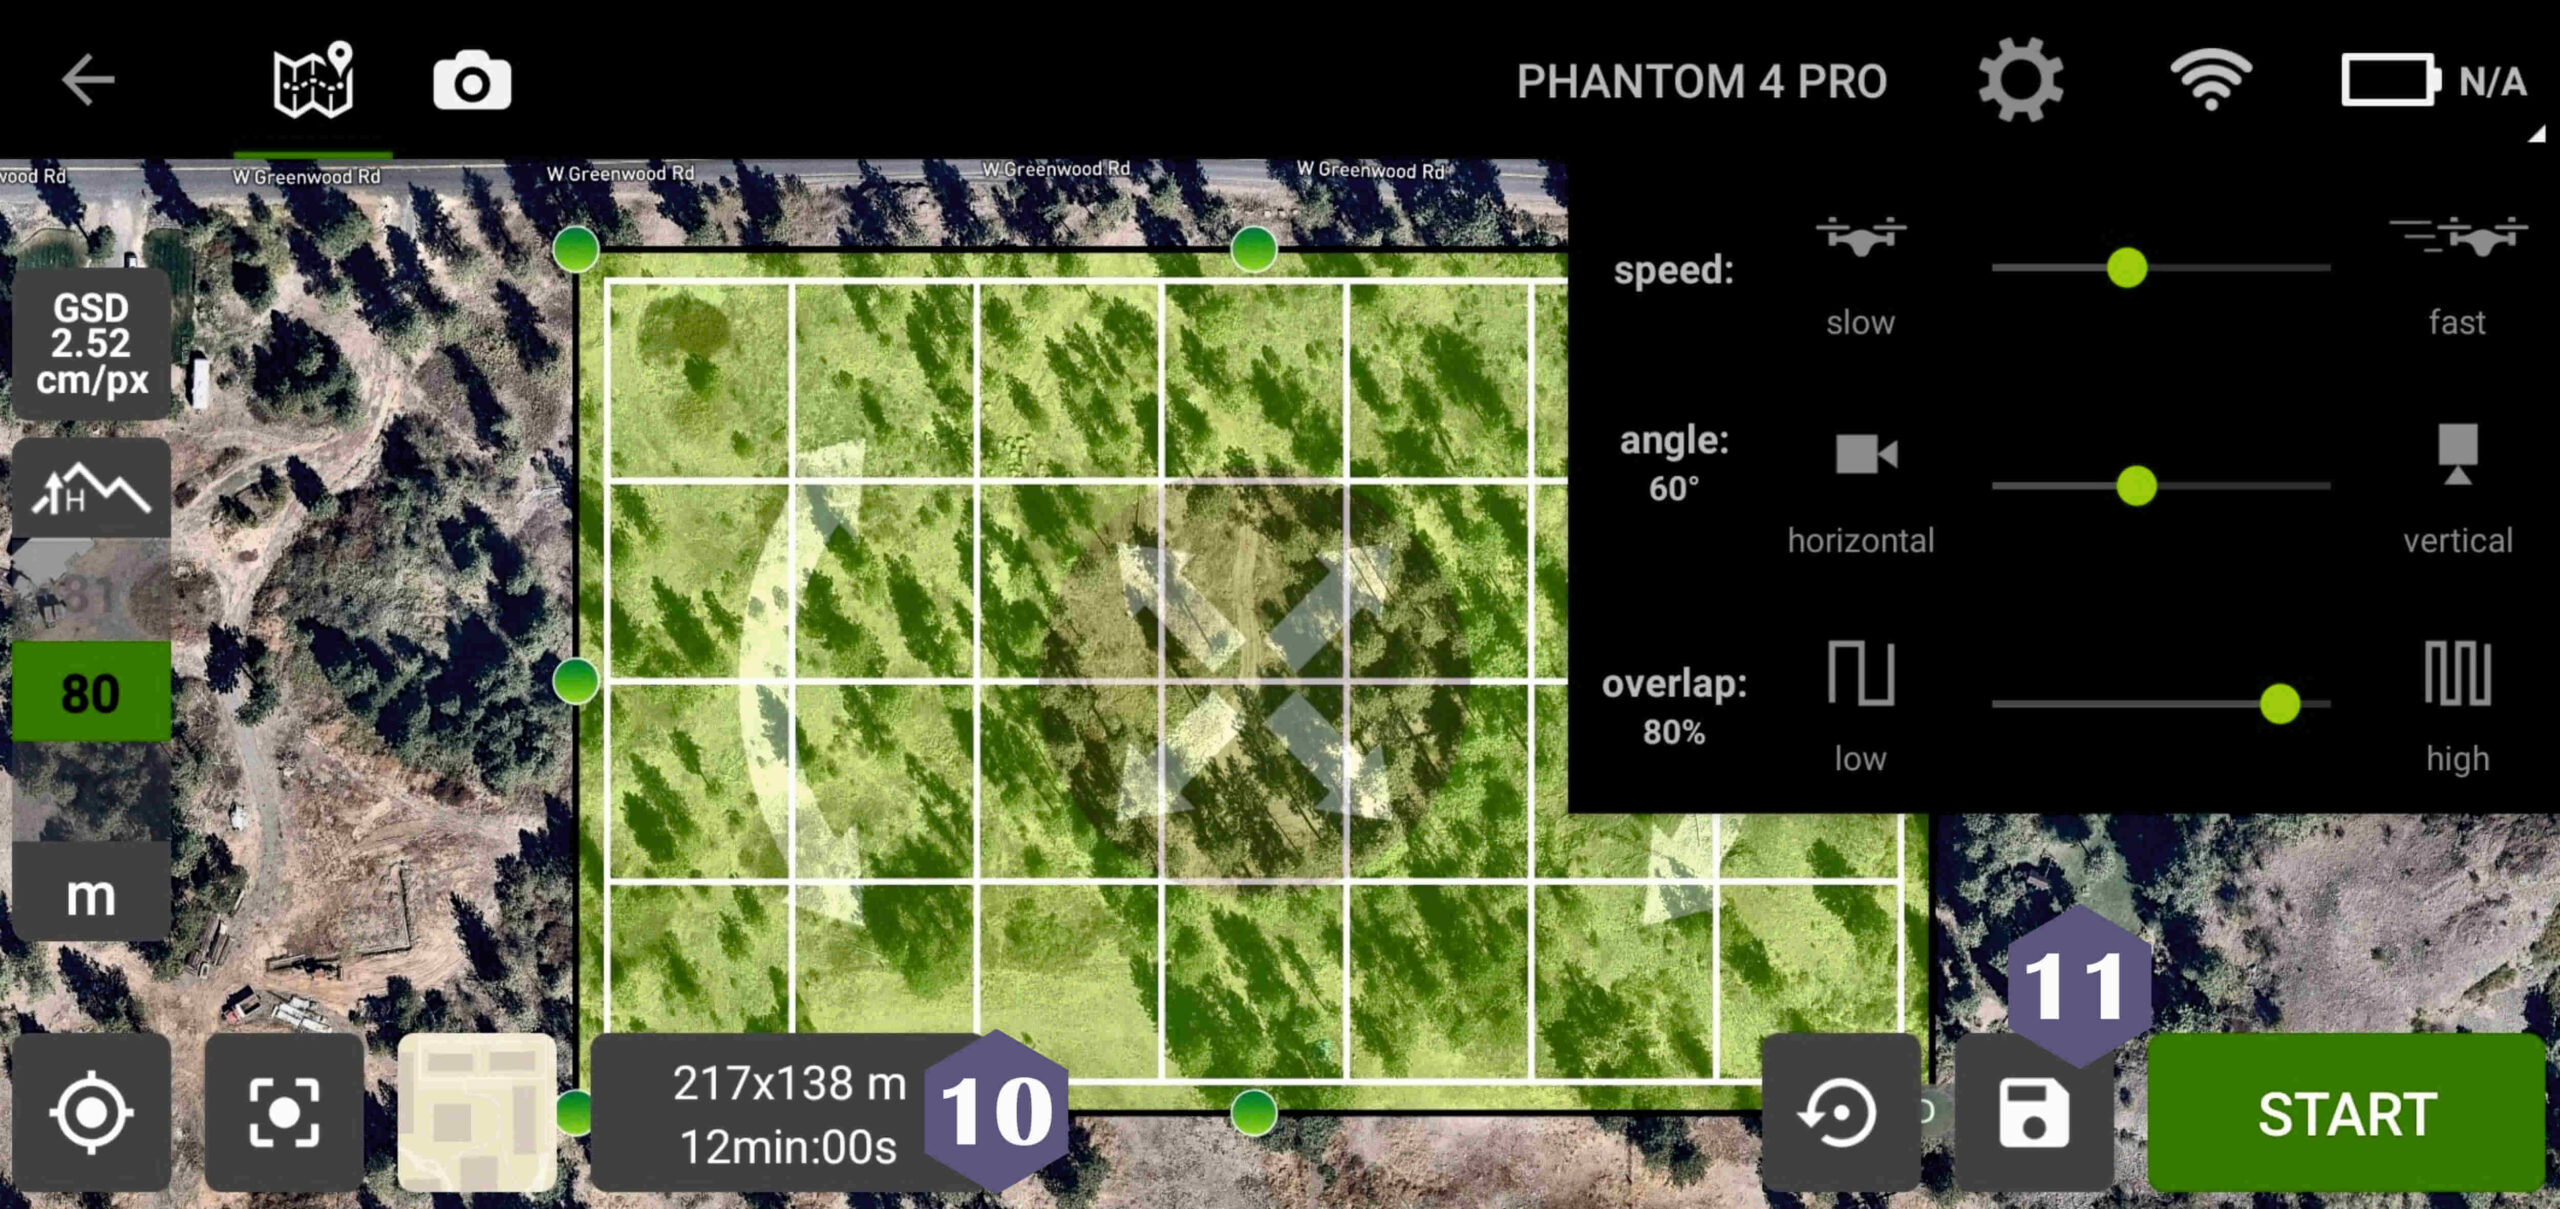
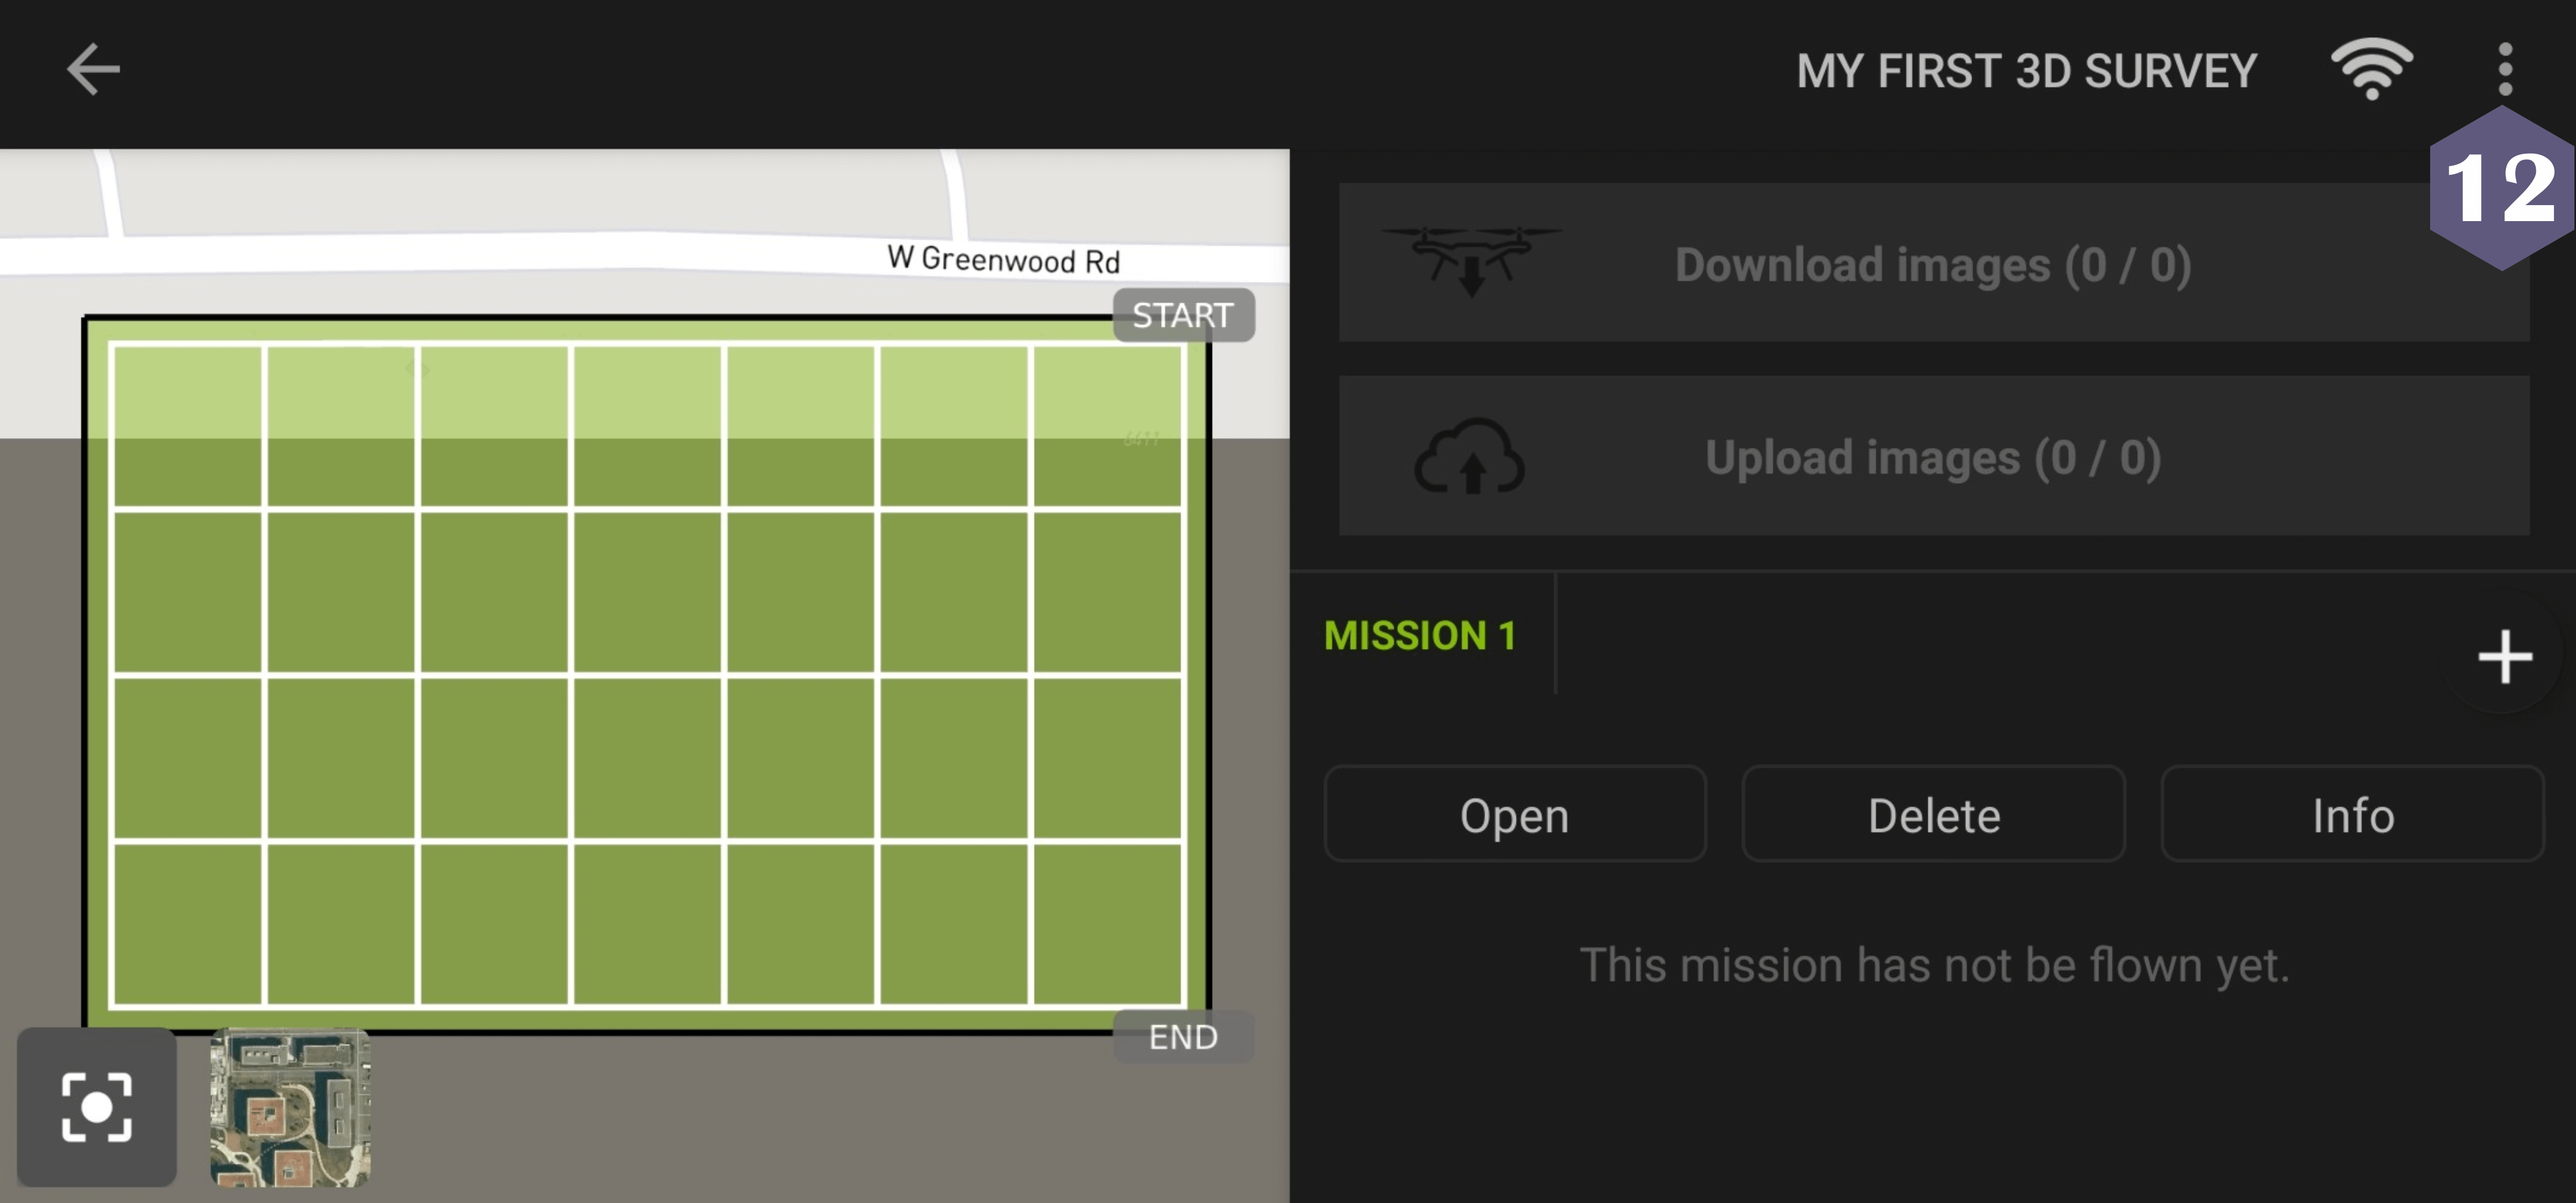
After the settings you can see how much time the mission will take (10). You can also save the project by clicking on the small floppy disk (11). This will be added to the list of projects, which is also available from the home page of the software.
Finally, by clicking on the three dots in the upper right corner (12), you can rename or delete the project, or open a KML file.
Sidenote: A few thoughts on loading the KML file… The need to plan a flight path to a remote location often arises. The area of the flight path can be created in Google Earth or some GIS software (e.g. QGIS) and exported as KML file. This is good because you don’t have to mess around at the flight site and waste time with route planning. It is important to emphasize that PIX4D Capture is considered a very simple route planning software and is not yet able to import a KML file and fit a flight route plan to it. Furthermore, unfortunately, there is no option to automatically zoom to the opened KML file on the map, this must also be done manually. After selecting one of the surveying methods presented in the previous chapters the surveying area must be manually fitted onto the polygon loaded from the KML file.
With DroneHarmony, which we recommended at the beginning of the article, you can also plan a route with a KML file.
If you’re done, press the “Open” button and then the “Start”. Here you will receive a summary of the mission, and then the takeoff can begin.

When you’re done flying, you can view the images on the drone’s SD card or set them to automatically download to your phone/tablet in the PIX4D Capture app.
If you need more information or you are stuck somewhere here is the official user manual.
If you really liked what you read, you can share it with your friends.
Did you like what you read? Do you want to read similar ones?