
The goal of this current quick start article is to present how to take photos for ground photogrammetry (and close-range photogrammetry) use. In the blog post I reveal the rules you need to follow to be able to photograph various smaller objects or surfaces (such as walls) with the right quality and make them suitable for 3D modeling.
If you haven’t read our previous article I suggest you to do so, because it presents a short summary of what photogrammetry is and what are the main fields of application.
So what are we going to discuss? We are going to talk about taking photos for ground photogrammetry (and close-range photogrammetry) use, which means images taken with a mobile phone or digital camera. We will cover what basic photography concepts you need to be aware of and how you can expose properly. Finally, we will also talk about the photogrammetric photography plan. Yes, the latter does exist… 🙂
The output files of the photogrammetry survey can be large point cloud, orthomosaic, digital elevation model (DEM) and 3D models. These can be difficult to share with the client and colleagues. It is strongly recommended to use the SurveyTransfer data sharing software! For more information, visit the website of the software manufacturer by clicking HERE.
1. Close-Range photogrammetry – BE AWARE OF THE BASIC CONCEPTS OF PHOTOGRAPHY
It is extremely important that you need to be familiar with at least the basic settings of the camera! There are a lot of factors that affect the quality of your images, and since you can build a 3D model from these images, you can decide here whether or not your model will be of good quality.
We have put together the three most important settings to be sure to check and test before you start shooting. If you’re interested in knowing more about photography than described here, I recommend this article as a starting point.
1.1. APERTURE
Aperture or aperture is a variable-diameter circular aperture through which light enters the camera’s image sensor. By changing the diameter of the compartment, you can control how much light enters the sensor. Diameters are denoted by different numbers, such as f/1.4, f/2. The point is that with each change in diameter, you can double or halve the amount of incoming light.
Depth of field determines which areas in the photo are sharp. The smaller the number of f values you use (such as f/2), the less area will be sharp.
Depth of field also depends on the distance of the subject to the camera, the size of the sensor, or the focal length used.
If you are taking photos for close-range photogrammetry, keep in mind the followings:
- Use as small a f-number as possible when shooting a smaller subject and you do not want the background to appear. I consider something as a smaller object if its entire surface can be photographed with one single camera angle. With smaller objects it’s inevitable that a background, and thus unnecessary data, will also be created. With a lower f value, the subject will be sharp while everything else will be blurred. In the case of f/2.8 and below we are talking about really shallow depth of field.
- The closer you take your camera closer to the object, the more you are able to blur the background.
- If you want everything to be sharp on the picture, set f/11 or higher.
1.2. SHUTTER SPEED
Shutter speed means how long we let light into the camera’s sensor. For example, the shutter speed can be set from 1/8 to 1/1000 sec.
The higher the shutter speed (e.g. 1/8) the longer the light is allowed to enter the camera. This is especially useful when capturing city lights or the sky, but our goal here is to survey various objects from which we can create a map or a 3D model. Because the camera can move during a photogrammetric survey (either we move it or a vehicle carries it), you may want to lower the shutter speed (such as 1/1000) to avoid blur and capture a frozen image.
Sidenote: It is optimal to take pictures using a camera tripod.
1.3. PHOTOSENSITIVITY (ISO)
On digital cameras you can set the photosensitivity (ISO). The default is ISO 100; you can double to increase it. Most cameras now also support setting values between the basic scale. Increasing the ISO value increases the noise, which is not really positive. Try to keep the ISO value as low as possible so that the shutter speed and depth of field are correct. Afterall, try to keep the ISO as low as possible. Under normal circumstances (in bright daylight, without additional lighting and when shooting by hand) the default value is 100. Don’t worry if the pictures are a bit noisy, it still can be a good survey.
2. Close-Range photogrammetry – EXPOSE CORRECTLY
If you understand the concepts of aperture, shutter speed and the photosensitivity we need to take a closer look at the exposure. The exposure is the correct setting of the previous three values to produce a sharp and bright enough image of the subject to be imaged. Most of the writing on the basics of photography uses the exposure triangle to show how these settings work together. This figure really illustrates these elements and the effects of the extreme values.
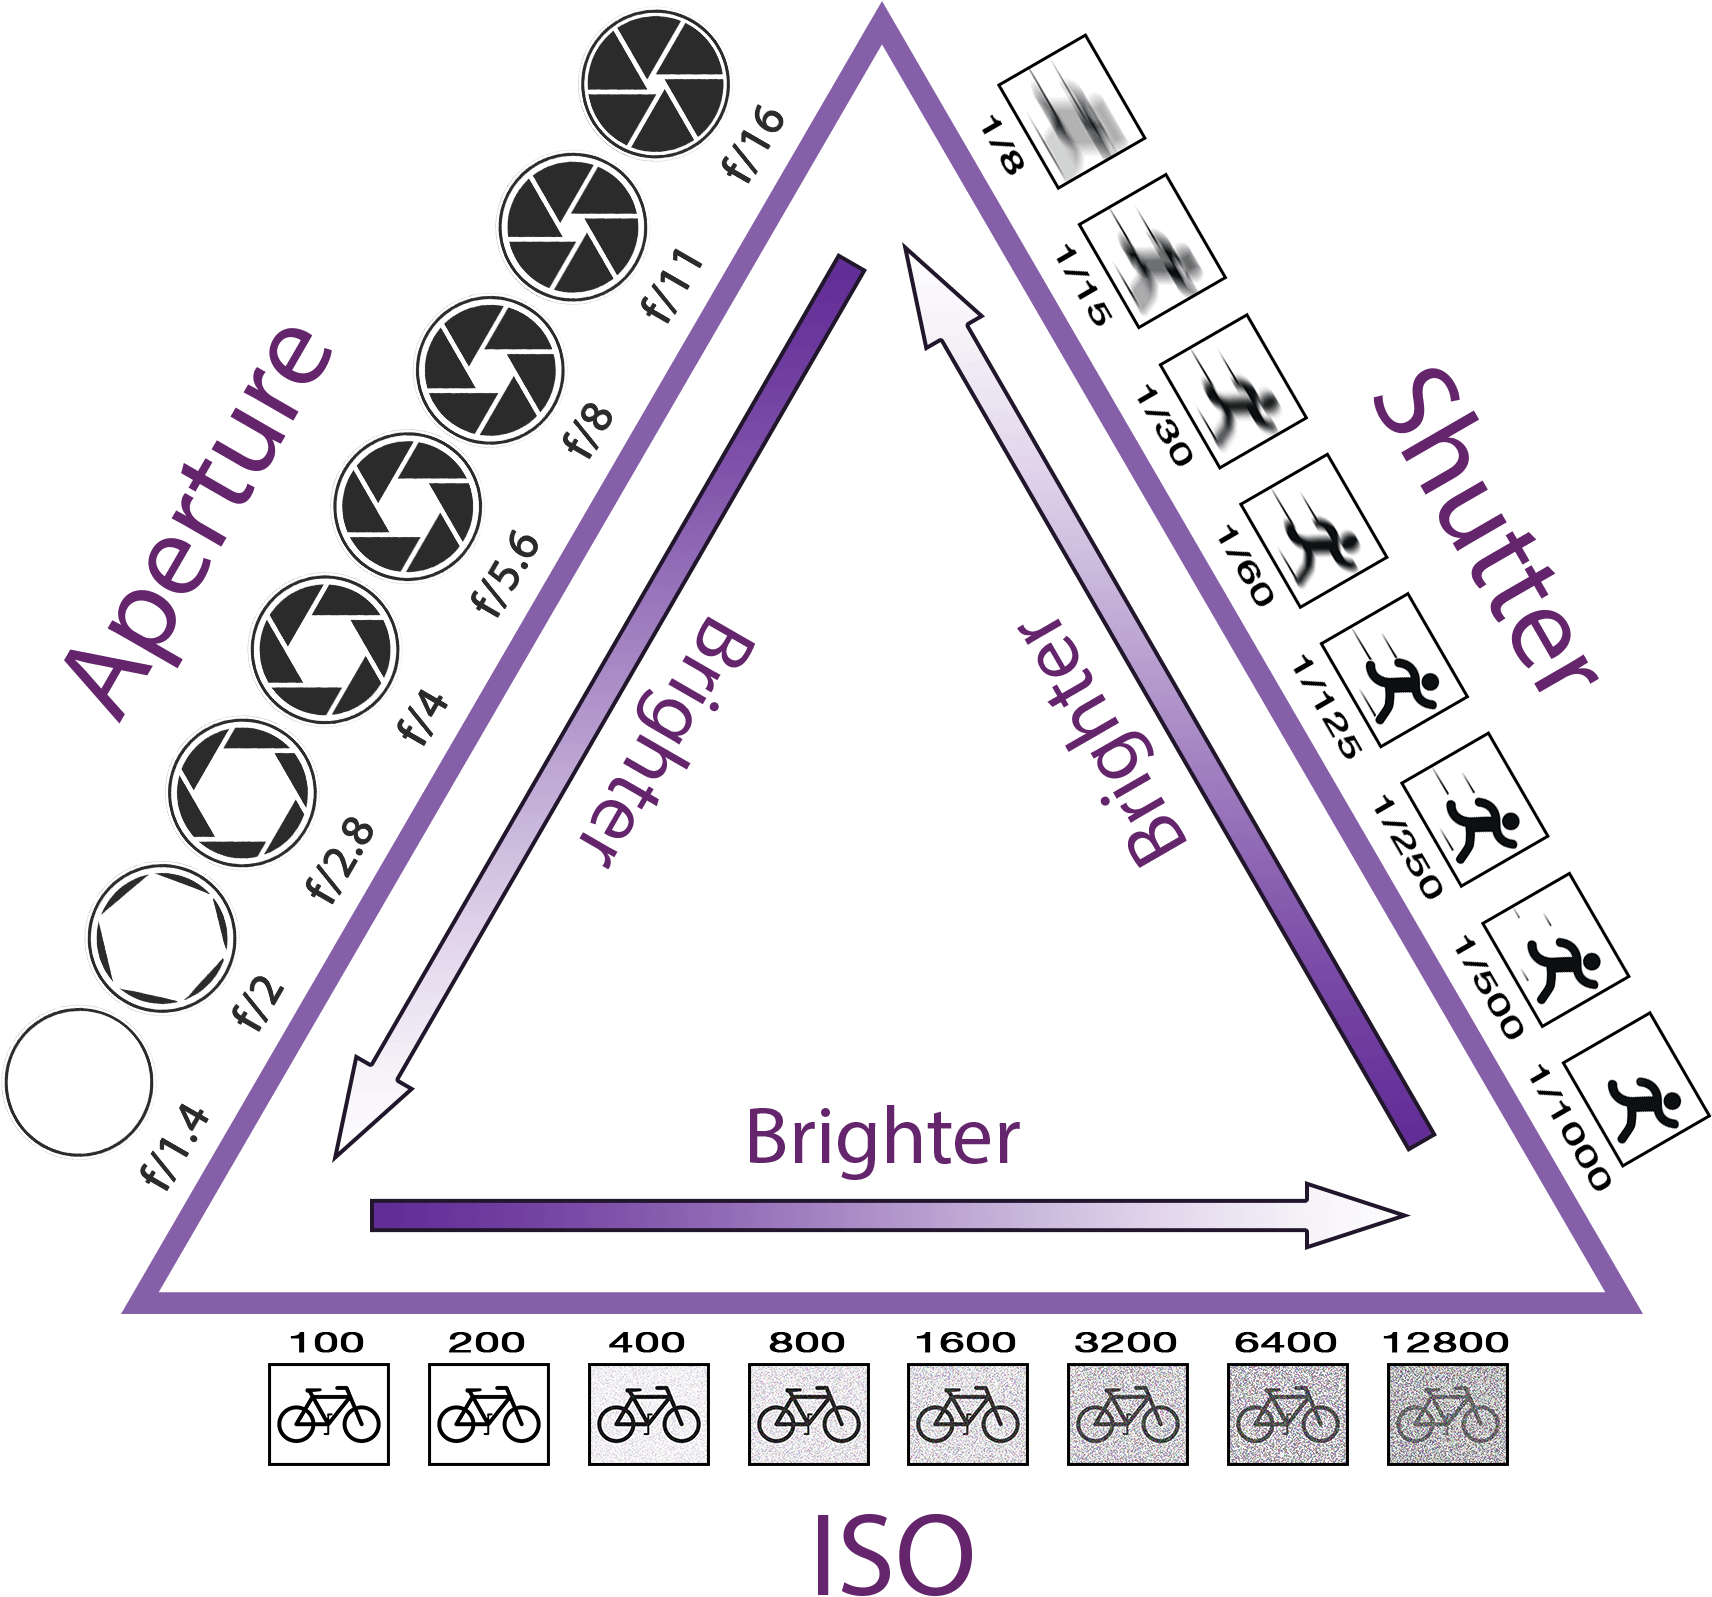
Source: The exposure triangle above is from the Action Camera Blog.
The exposure triangle shows that the shutter speed is inversely proportional to the sensitivity to light, i.e. twice the ISO speed belongs to half the shutter speed for the same amount of light. For a properly exposed image at a higher ISO value, we need to reduce the amount of light entering the sensor, which means a smaller shutter speed or a narrower aperture (larger f-number). For lower ISO values, we need to increase the shutter speed or the f number.
3. Close-Range photogrammetry – PLAN THE PHOTOSHOOTING
So far, we have built from the basic elements of photography, which is not surprising since we use photographs in photogrammetric processing. Therefore, our data collecting method is taking photos. If we manage to take high quality images, it’s still half the success. Why half? Because in order to produce images that can be evaluated from a ground photogrammetry (and close-range photogrammetry) point of view, it is also necessary to take images with the right overlap, from the right directions and distances. In order for an object to be reproducible as a 3D model based on photographs, a photography plan is required.
Sidenote: The photography plan equals the itinerary of a drone or plane through an aerial photogrammetric survey.
Since this is a quick start article, I present creation of a ground photogrammetry (and close-range photogrammetry within that) plan in two base cases:
- When you want to photograph a surface, a part of the entire object – This is typically the case when it is not possible to capture the entire object from a camera angle. These can be a long house block, a wall, a slope, and so on.
- The other case is that you want to capture the entire object – Here is a situation where the entire object from one camera position fits into an image. However, you also want to add each side of the object separately for 3D modeling. Such a smaller object can be a statue, a log, a shoe, but also a human or an animal.
In the following two subsections I will advise a photography plan for both cases. However, keep in mind that these plans don’t work for all cases. Always think through that particular situation so that the subject to be captured can be reproduced as well as possible in 3D.
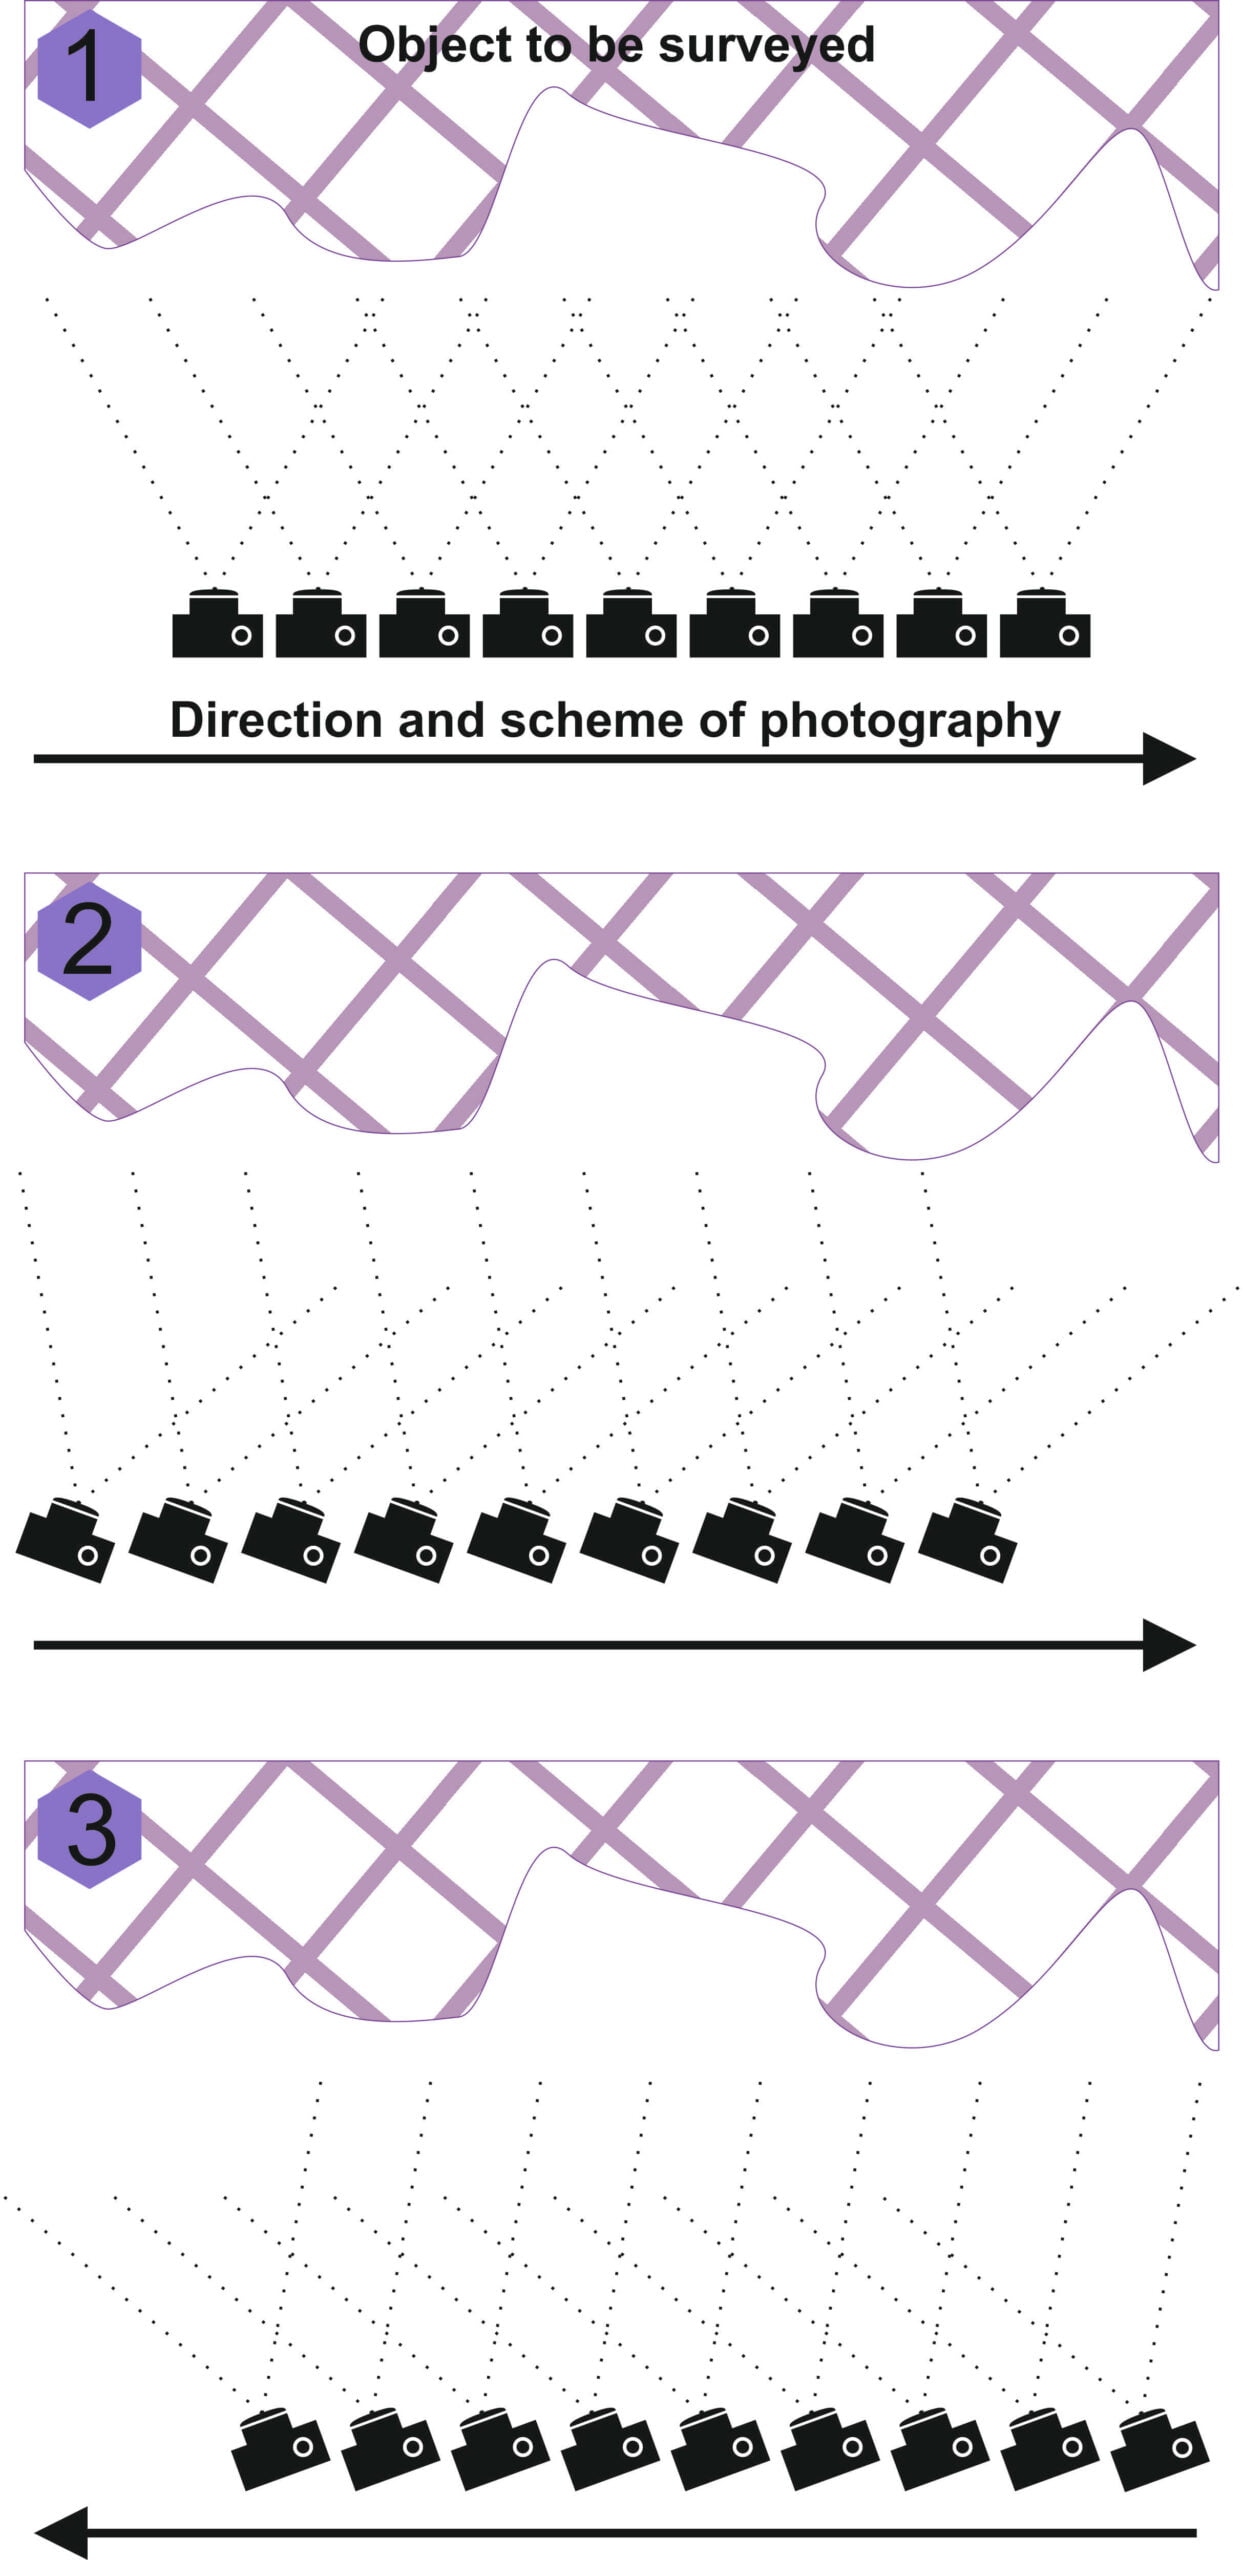
3.1. PHOTOGRAPHY PLAN FOR A SURFACE
For photographing surfaces, I advise the following 3 steps. The first phase is to move parallel to the surface and shoot an image about every half a step so that the camera is quasi-perpendicular to the plane of the object. Remember to focus on the parts that are most important to you, or if everything is equally important, you can even take several series (vertically divided) of photos (Figure 1 below). The next step is to recapture the entire surface by tilting the camera but moving parallel to the wall (Figure 2 below). Then, tilted from the other direction, shoot from the opposite side (Figure 3 in the following figure). Why is this good? This will be especially useful if you are photographing a very irregular surface and there are reclining areas. You can’t capture these reclining parts if you only take photos from against the wall. The whole process is illustrated in the following figure.
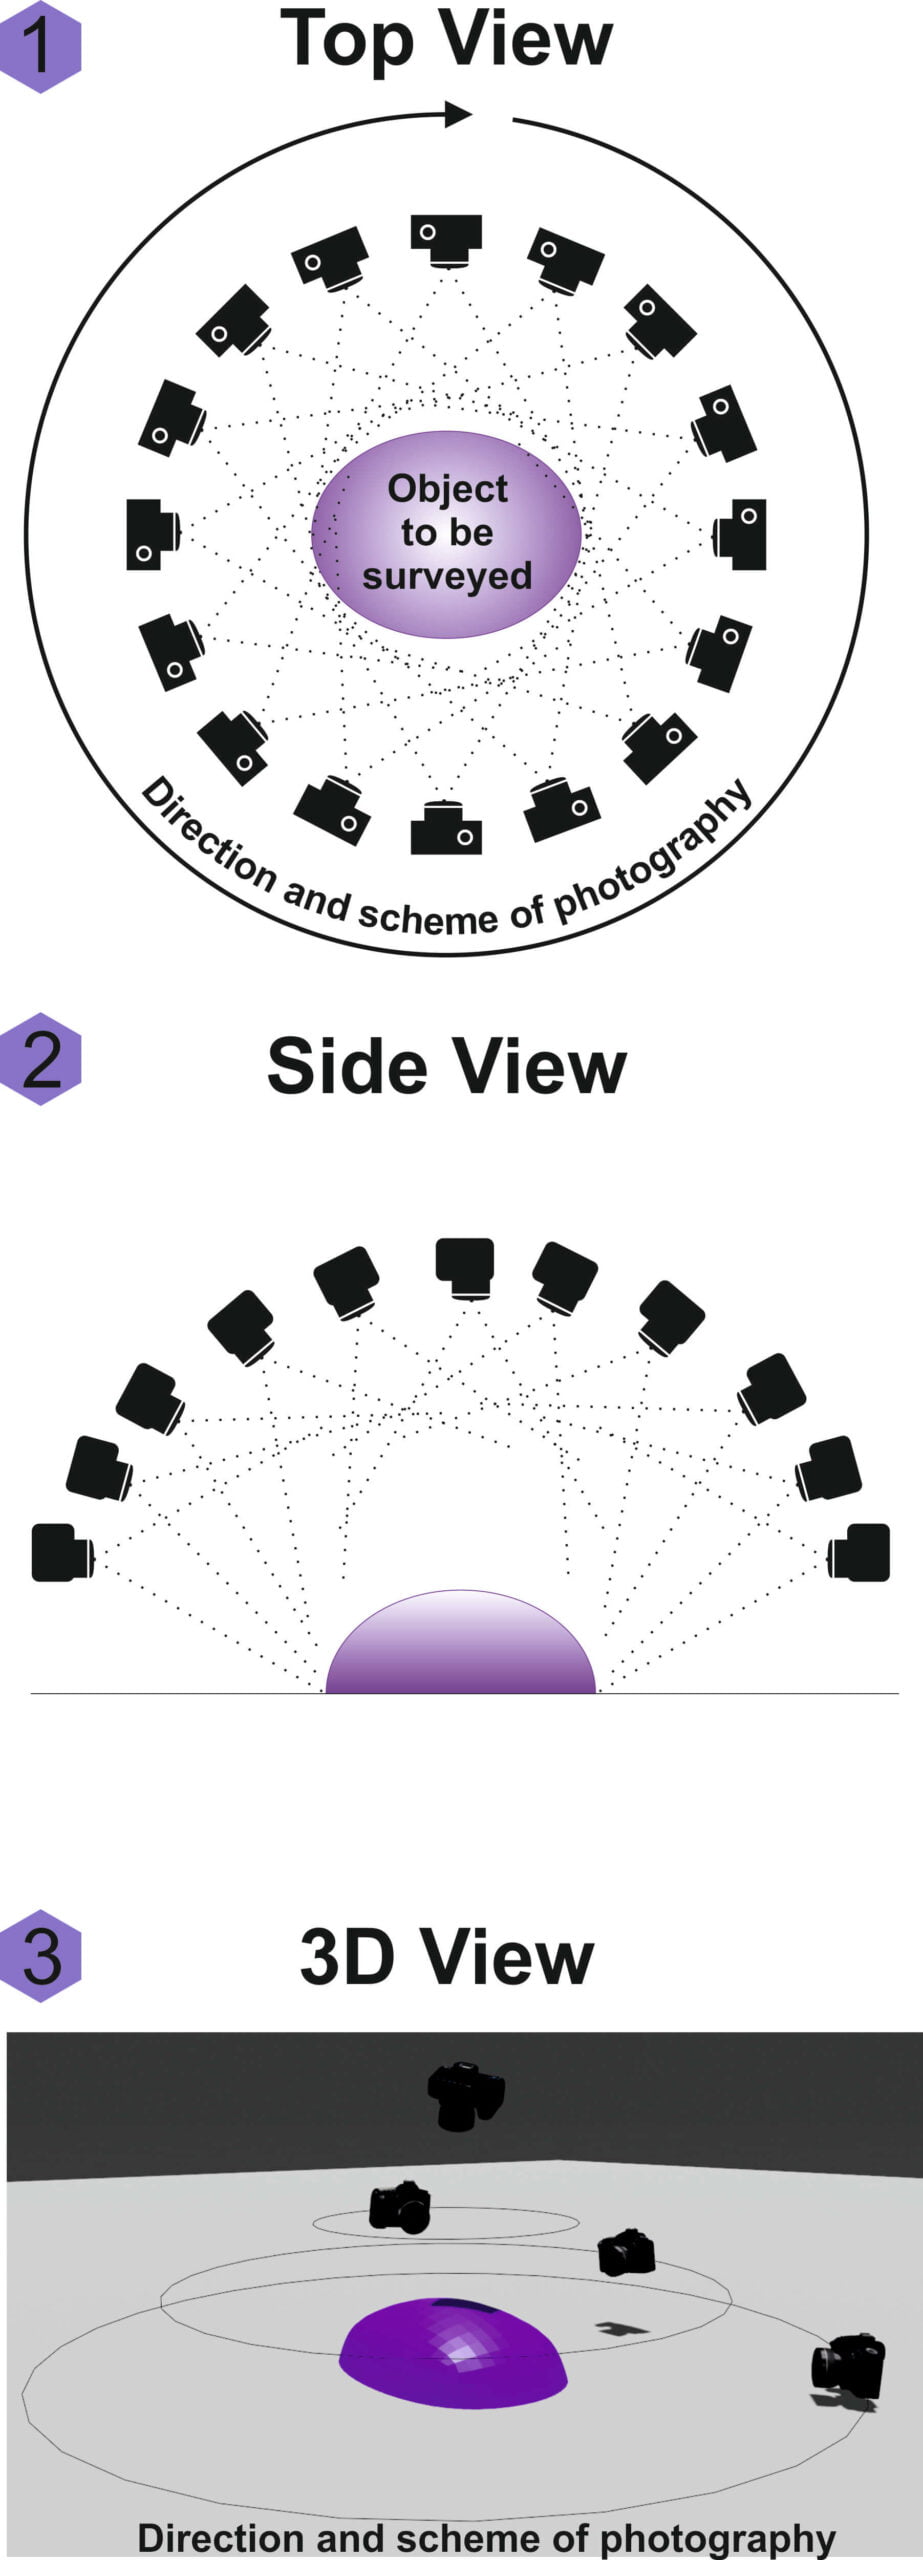
3.2. PHOTOGRAPHY PLAN FOR A SMALLER OBJECT
If you’re photographing a smaller object, I suggest you to perceive the geometric center of the object and target it with your camera. Take photos of the subject from different heights and different camera angles. Shoot the subject in concentric circles. I suggest taking a photo at approximately 20-22.5 ° intervals while taking one such lap.
Sidenote: If the object you want to capture is very small, you can also create a photography template that you can place on or around your subject. This template can even contain a coordinate system that allows you to give the model real-world spatial dimensions. In addition, you can display the location of the camera angles on the template, which can help with an optimal 22.5 ° / image (16 photos in total) distribution within a range of shots.
The easiest way to look at this photography plan is as if you need to fit a hemisphere around the subject to be photographed. Then, moving along the surface of the hemisphere, you need to take photos that focus on the geometric center of the object.
After concentric circles, you can also take more detailed photos when you don’t have to stick to the geometric center of the subject. To make your job easier, I’ve created a series of diagrams that show the process in both top, side, and 3D views.
Sidenote: Of course there are cases when you need to use the two presented plans simultaneously. For example, if you want to photograph a building and walk around the building and take photos from different perspectives and angles.
If you really liked what you read, you can share it with your friends.
Did you like what you read? Do you want to read similar ones?